3/29/2011

How to Rip DVD and Convert Video to any video formats?

Many people want to enjoy HD DVD and video on their Sansa, iPod MP4, iPhone, Walkman,Creative Zen, PSP. But they often get difficulties in this process because their portable devices usually can not support DVD and other video formats.

Now all is gone. With the release of Tipard DVD Ripper and Tipard Video Converter, All people can convert DVD and video to videos supported by iPod, iPhone, Zune. Sansa, Creative Zen, PSP, etc.

This guide shows how to use the professional programs above.

It includes two parts:

Part 1: How to Rip DVD to MP4/AVI/MP3/WMV/3GP
Part 2: How to convert video to MP4/AVI/MP3/WMV/3GP

Step 0: Download and install Tipard DVD Ripper.
Step 1: Click "Load DVD" button to load your DVD.
This professional DVD Ripper can load three DVD source, you can load your DVD from DVD drive, DVD folder in your PC and also IFO file.


DVD Ripper
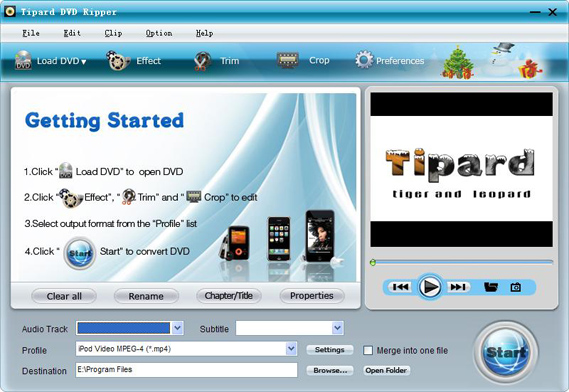
Step 2:Select the output video format you want from the "Profile" drop-down list.
Step 3:Click the "Start" button to begin your conversion.
You can have a coffee or have a walk now ! In a short while the conversion will be finished.

Tips:
Some powerful editing functions are available as followings.
1: Capture your favorite picture.
If you like the current image of the video you can use the "Snapshot" opinion. Just click the "Snapshot" button the image will be saved.
2: Merge videos into one file.
Just check the "merge into one file" option if you want to merge the selected contents into one file As default the merged file is named after the first selected file (either a title or a chapter)
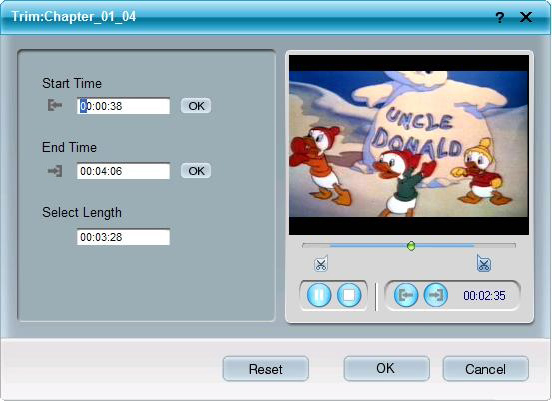
3: Trim any clip of your video.
You can get any clip of your video by just using the "Trim" function. You can click the "Trim" button and a dialogue pops up. You can set the Start Time and End Time or just drag the slide bar to the position you want and start conversion then you can get the clip.

Trim

4: Crop video
There are two methods available to crop your video:
Method 1: Crop by selecting a crop mode
Select a crop mode in the Crop Mode drop-down list and click OK to save the crop. There are seven pre-set crop modes for your choice: No Crop, Cut off Top and Bottom black edges, Cut off Top black edge, Cut off Bottom black edge, Cut off Left and Right black edges, Cut off All black edges and Custom. For "Custom", it allows you to customize your movie according to your needs. To crop your movie video, you can just drag your mouse cursor from four sides and four angles.
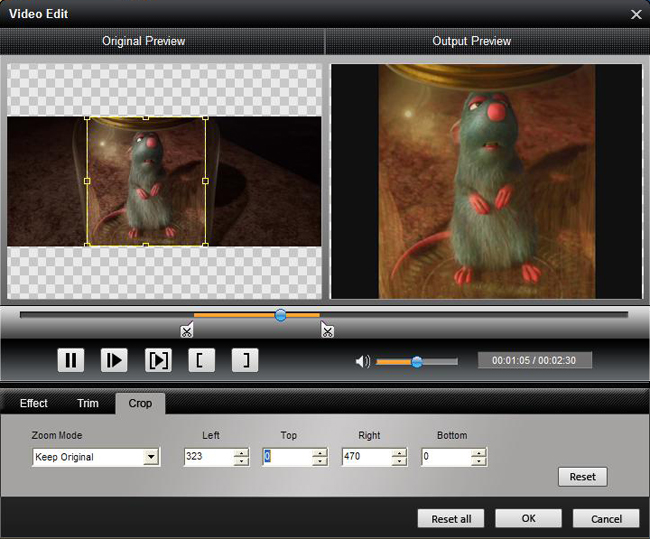
Method 2: Crop by setting the crop values
There are four crop values on the lower right part of the crop window: Top, Bottom, Left and Right. You can set each value to crop your movie video, and the crop frame will move accordingly.

Crop

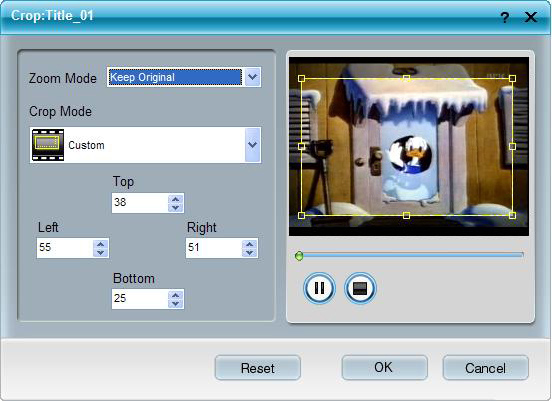
Note: Before you start to crop your movie video, you can select an output aspect ratio from the Zoom Mode. There are four choices available: Keep Original, Full Screen, 16:9 and 4:3. After you select an output aspect ratio and finish the crop, the result can be previewed in the Preview window of the program main interface.

Part 2: How to convert video to MP4/AVI/MP3/WMV/3GP

Step 0: Download and install Tipard Video Converter
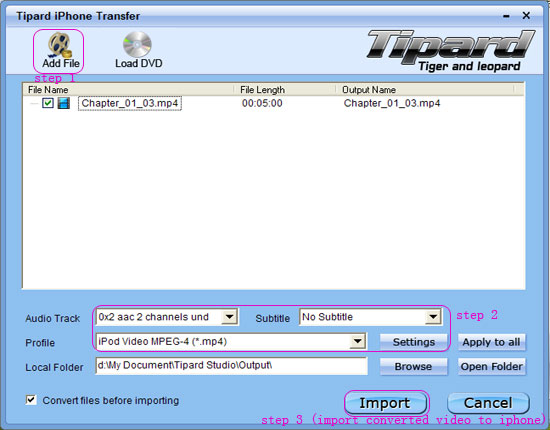
Step 1.Click the "Add File" button to load video file.

Video Converter
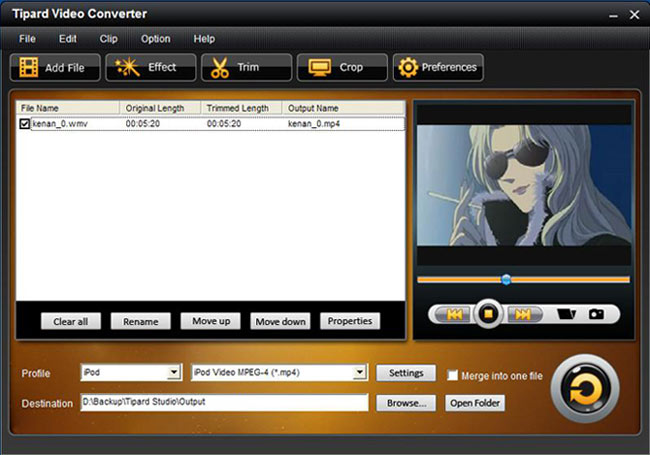
Step 2. Video setting
Select the output video formats you want from the drop-down list of profile
Note:
By cicking the "Setting" button, you can set the video parameters and audio tract.
step 3.Click the "Start" button to start conversion, it is very fast and in a short while your conversion will be finished.
Tips
1: Snapshot
If you like the current image of the video you can use the "Snapshot" option. Just click the "Snapshot" button the image will be saved and then click the "Open" button next to "Snapshot" button to open your picture.
2: Merge
If you want to merge several videos into one file you can choose them and click the "Merge into one file" to do it.
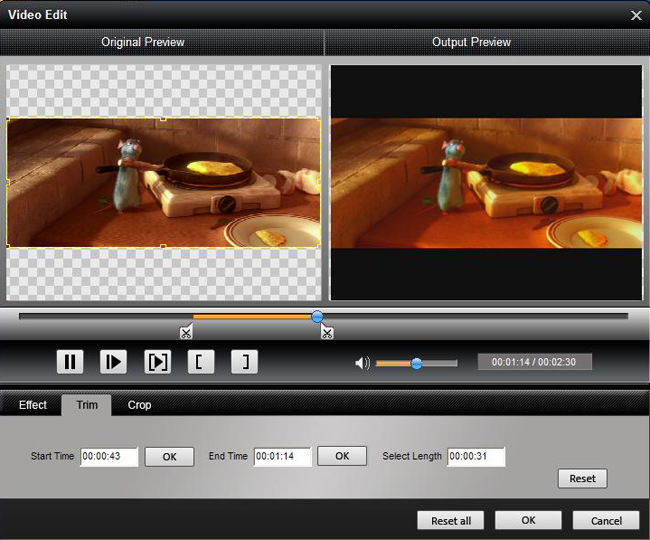
3: Trim
If you just want converter a clip of your video, then you can use the "Trim" icon to set the Start time and End time of the clip or you can directly drag the slide bar to the accurate position.

Trim

5 Crop
By using the "Crop" function you can crop the black edge of your video and you can also drag the line around the video image to adjust your video to your Google Phone.

Crop

Now you can enjoy your DVDs and Videos on your Google Phone at any time and anywhere!

3/23/2011

How to Transfer DVD, Video, Audio and Picture Between iPod/iPhone and PC

Want to easily transfer video/audio/picture from iPod/iPhone to computer?

Want to easily transfer video/audio/picture from computer to iPod/iPhone?

Want to convert DVD/video/audio source to iPod/iPhone supported files?

Want to create iPhone Ringtone from other source files at will?

Here you have two pieces of software to choose from:Tipard iPhone Transfer and Tipard iPod Transfer Pro. They respectly have their own transferring functions just as said above.


Part 1: Tipard iPhone Transfer can transfer video, audio and picture from iPhone to PC and transfer video and audio and picture from PC to iPhone. It can directly convert DVD and video to iPhone supported files. And the software supports iPod, iPod Classic, iPod Nano, iPod Shuffle, iPod Touch. If you think this one is suitable for you, you could free download here.


Step 1: Connect iPhone to your computer, then the transfer can automatically load your iPhone into it. The user interface of the software will show you the version of your iPod, the used and left spaces on your iPod.


iPhone Transfer Screenshot

Step 2: Click Audio, Video or Picture on your iPod, will be displayed automatically, see screenshot as follows:


transfer DVD/video/audio to iPhone

Step 3: Select the files you wanted to transfer by click them.

Step 4: Click "iPhone to PC" or "PC to iPhone" button, then a pop-up window will appear for you to choose the place for the transferred files. After few seconds the transfer process will be finished.

If you want to add DVD or video to your iPhone, you can click "File" and then "Import File". The interface below jumps on the computer. The converted DVD or video is directly imported to your iPhone


transfer DVD/video/audio to iPhone

Part 2: Tipard iPod Transfer Pro that can transfer video, audio and picture from iPod to PC and transfer video, audio and picture from PC to iPod. It can directly converter DVD and video to iPhone supported files. And the software supports all version of iPod, iPod Classic, iPod Nano, iPod Shuffle, iPod Touch.

And then connect iPod to your computer, then the transfer can automatically load your iPhone into it. The user interface of the software will show you the version of your iPod, the used and left spaces on your iPod. If you think this one is suitable for you, you could free download here.


iPod Transfer Pro

The specif steps are the same as the iPhone Transfer above. You can take it as reference.

Note:
This program supports iPhone OS 3.0/3.1, iPod Firmware 3.0/3.1.

Believe you get anyone of them suitable for you, you will easily transfer or copy your video, audio and picture from PC to iPod/iPhone, from iPod/iPhone to PC and between iPod and iPhone.

3/15/2011

How to transfer songs/movies/TV shows/Podcasts/Books/iTunes U from iPod to computer?

Step by Step Guide

Step 1: Install and register Tipard iPod to PC Transfer Ultiamte

Download Tipard iPod to PC Transfer Ultimate installation file, then double click the downloaded installation file to start installation; next, follow the instructions to finish the installation.
After installation, please launch iPod to PC Transfer Ultimate, then enter correct User Name and registration key in pop-up registration window, then click "Register" button to finish registration.

Step 2: Connect your iPod

After registration, you will see the the following screenshot.

Interface

Connect your iPod to PC via Apple dedicated data line, than you will see the following image.
Once connecting, your iPod will be recognized instantly, and the detailed information about your iPod will be displayed, including type, capacity, version and serial number. Plus, it will show the specific capacity values of different iPod files which have taken, and the available space.

Step 3: Choose any file type you want to transfer

show iPod files

On the left side of the main interface, you will see the display list, which will show your various iPod files in different types. You can freely choose any kind of file type(music, movie, TV shows, Podcast, Books, iTunes, Camera roll, pictures, etc.) to transfer to your PC for backup and safety.

A: Transfer iPod songs

Click "Music" on the display list, then the right side of the interface will display all your music files in details as the following screenshot shows.
In front of each listed music file, there is a check box, you can check all to choose all music files or just one to choose, then the "Transfer" button will be activated instanly.

Transfer iPod songs

B: Transfer iPod movies

Click "Movies" on the display list, then the right side of the interface will display all your movies in details as the following screenshot shows.
In front of each listed video file, there is a check box, you can check all to choose all movie files or just one to choose, then the "Transfer" button will be activated instanly.

Transfer iPod movies

C: Transfer iPod TV Shows

Click "TV Shows" on the display list, then the right side of the interface will display all your TV Shows in details as the following screenshot shows.
In front of each listed TV show files, there is a check box, you can check all to choose all TV shows or just one to choose, then the "Transfer" button will be activated instanly.

Transfer iPod TV shows

D: Transfer iPod Podcasts

Click "Podcasts" on the display list, then the right side of the interface will display all your Podcasts in details as the following screenshot shows.
In front of each listed Podcast files, there is a check box, you can check all to choose all Podcasts or just one to choose, then the "Transfer" button will be activated instanly.

Transfer iPod Podcasts

E: Transfer iPod Books

Click "Books" on the display list, then the right side of the interface will display all your book files in details as the following screenshot shows.
In front of each listed book files, there is a check box, you can check all to choose all book files or just one to choose, then the "Transfer" button will be activated instanly.

Transfer iPod movies

F: Transfer iPod iTunes U

Click "iTunes U" on the display list, then the right side of the interface will display all your iTunes U files in details as the following screenshot shows.
In front of each listed iTunes U files, there is a check box, you can check all to choose all iTunes U files or just one to choose, then the "Transfer" button will be activated instanly.

Transfer iPod movies

Step 4: Start transferring files

Click "Transfer" button to start to copy any kind of file type you like to PC for backup. After transferring, the output folder will pop up automatically.